FALVEY LIBRARY

One Stroke at a Time

  • Posted by: Kristin de Ghetaldi
  • Posted Date: September 2, 2015
  • Filed Under: Conservation
Figure 1:  Overall image of “Triumph of David” before inpainting.

Figure 1: Overall image of “Triumph of David” before inpainting.

Figure 2: Golden PVA  conservation paint.

Figure 2: Golden PVA
conservation paint.

After two years of research and treatment, the “Triumph of David” conservation project is coming to an end. The 19½-foot mural has been x-rayed, examined, cleaned, filled, and textured thanks to an interdisciplinary team of conservators, interns, and volunteers. Over the last couple months, we have been working on the final step in our treatment before varnishing: inpainting.

“Inpainting” is the process of reconstructing lost areas of a painting with reversible conservation paints. As described in a previous post, a base layer of red gouache was applied to the Modostuc fills to match the stratigraphy of the original painting. When texture was needed, a thin layer of tinted wax-resin was added on top of the fills and textured using silicon molds. Once the filling stage was complete we began inpainting using Golden PVA conservation paints (Gamblin conservation paints were also used in certain areas).These paints are made from a PolyVinyl Acetate resin and are generally diluted with alcohols.

Figures 3&4: Detail of King Sal’s right shoulder  before and after inpainting.

Figures 3&4: Detail of King Sal’s right shoulder
before and after inpainting.

We used fine, Kolinsky sable brushes to carefully paint within the edges of the loss. Matching the color is only half of the battle. It is equally important to match the level of gloss on the original surface. We accomplished this by adjusting the amount of medium added to our paints.

If a future conservator wants to remove our inpainting for any reason, they can do so safely without disturbing any of the artist’s original paint. Aged paints and other materials such as varnish coatings fluoresce under ultra violet light while recently applied retouching does not.

Figures 5&6: Detail image of sky  before and after inpainting.

Figures 5&6: Detail image of sky
before and after inpainting.

Unfortunately, previous restorers did not use reversible paints and often overpainted areas of loss, occasionally misinterpreting original compositional features.One example concerns the “spear” found along the left edge of the painting. An infrared image of the top left corner of the mural revealed that the artist had originally painted a halberd; an axe-like weapon that has been “used as a court bodyguard weapon for centuries, and is still the ceremonial weapon of the Swiss Guard in the Vatican” (definition from Wikipedia) The conservators were able to use the surviving original paint in conjunction with the IR image to successful reconstruct the shape of the halberd.
Figures 7,8,&9: (Left) Top left corner before removing overpaint. (Middle) IR image of the spear (Right) Image from the Philadelphia Museum of Art. Artist: Unknown, Italian. Date: c. 1500-1550.

Figures 7,8,&9: (Left) Top left corner before removing overpaint. (Middle) IR image of the spear (Right) Image from the Philadelphia Museum of Art. Artist: Unknown, Italian. Date: c. 1500-1550.

Figures 8&9: Detail of top left corner halberd before and after inpainting .

Figures 10&11: Detail of top left corner halberd before and after inpainting .

The team is currently finishing up with the inpainting and plan to add the final layer of varnish within a week. It has been an exciting and rewarding project that we will all miss working on. The mural will continue to reside in Falvey Memorial Library’s Old Reading Room where students and the general public are welcome to pay a visit. Be on the lookout for our “Triumph of David” website that will be published soon!

Figure 14: Overall image of “Triumph of David” during treatment.

Figure 12: Overall image of “Triumph of David” during treatment.

Katie Rovito

“Wax on, Wax Off:” Silicone Casting Techniques for Textured Fills

  • Posted by: Amanda Norbutus
  • Posted Date: June 25, 2015
  • Filed Under: Conservation

Figures 1. Textured wax/resin fill
as seen in raking light.

Currently, the conservation of the Triumph of David has progressed to the in-painting stage of the conservation treatment.  However, before the conservation team could begin in-painting, the areas where there was significant loss of paint and/or ground layers had to be addressed.  All losses needed to be filled to match the surrounding surface area.

Most paintings have a textured surface.  This can include the artist’s brush strokes, impasto, and various craquelure patterns.  The surface of the fills can therefore be leveled and textured to blend with the surrounding substrate.  No matter how skillfully an area is in-painted, if a fill is not prepared carefully it will stand out from the original surface and cause unwanted distraction.

The Triumph of David has extensive paint and ground loss both the left and right sides.  A barrier layer of 15% B72 in Shellsol A100 was applied by spray application over the entire surface of the painting.  This high molecular resin helped to saturate and even-out the painted surface, without penetrating the substrate.  It also built up different levels of molecular weight, which ensures that all additional treatment application would be reversible.

.

Figure 3. Pigmented wax fill
is applied over Modostuc fills.

Figure 2. Pigmented wax (thinned in mineral
spirits) applied to the painting’s surface with
a palette knife. A fume extractor, gloves, or
other personal protective equipment are
used by team members during this process.

The filling process consisted of several steps.  First, Modostuc was used to partially fill the areas of ground and paint loss.  Modostuc is a PVA formulation based putty that is very dense compared to other fillers and has little to no shrinkage.  It was also toned red with gouache to match the original ground layer.  Next, wax fills (4 parts bleached beeswax, 2 parts Ketone N (Larapol K 80),1 part carnauba wax) were applied on top of the Modostuc fills, ensuring that fills were slightly above the painted surface.  In order to create the textured appearance on the wax fills, silicone molds made with various textures were used to press the patterns into the wax.

If you closely examine the surface around an area of loss, you will notice that the texture varies considerably from one point to another.  The conservation team had to be very precise about which area was chosen to cast the silicone molds, paying close attention to the borders of the losses.  Textures that had to be accounted for included canvas weave, brushstrokes, how much impasto there was, do the strokes follow a specific direction, and the crack patterns.  In the case of the Triumph of David, the crack patterns varied throughout the entire painted surface.

Figure 4. Placing a sheet of Mylar on
the target location and apply the
resin to the painting’s surface
with a palette knife.

Figure 5.  Use a rubber roller to roll the resin in a downward direction. Then, roll the resin in other directions, but do not taper the thickness at the outer edges.

Figure 5. Use a rubber roller to roll the
resin in a downward direction.Then,
roll the resin in other directions, but
do not taper the thickness at the outer
edges.

Once an area was selected for casting, the silicone resin was prepared.  The conservation team used Wacker’s Elastosil® M 4600 A/B, using the Mixing ratio: 10:1 pbw (for example, 10 grams resin to 1 gram catalyst).  This resin was found to be a good replacement of the RTV M 539, which is no longer made.  The resin was thoroughly mixed with the hardener and placed onto a clean transport sheet of Mylar.  Using a small palette knife, the resin was evenly applied onto the painting’s surface, ensuring that the resin did not taper at the outer edges.  This would cause uneven heat transfer and also make it more difficult to peel the cured resin. A clean sheet of Mylar (without wrinkles), a few inches larger in each dimension than the spread silicone, was secured over the silicone.  With the Mylar held taut, a rubber roller was used to press the silicone into the surface pattern until obtaining a thin, uniform film.  The silicone cast could then be carefully peeled off the painting with the Mylar.

Figure 6.  Seven locations in The Triumph of David were initially selected for casting molds.  These sites provide a range of surface textures including craquelure and brush strokes.

Figure 6. Seven locations in The Triumph of David
were initially selected for casting molds. These sites
provide a range of surface textures including
craquelure and brush strokes.

The appropriate cast was then be placed over the wax/resin filling by securing one side of the Mylar to the paint film with low-tack drafting tape, to keep it from shifting.  Heat was then applied with a tacking iron to warm the surface until the texture of the cast is printed onto the surface of the fill.  If there was too little wax/resin for an accurate transition, tiny bits of wax/resin was carefully added exactly where needed.  After all wax fills were textured, the team was able to move onto the in-painting phase of the treatment.

– Claire Burns and Keara Teeter

Seeing into “Triumph of David:” X-radiographs reveal hidden imagery

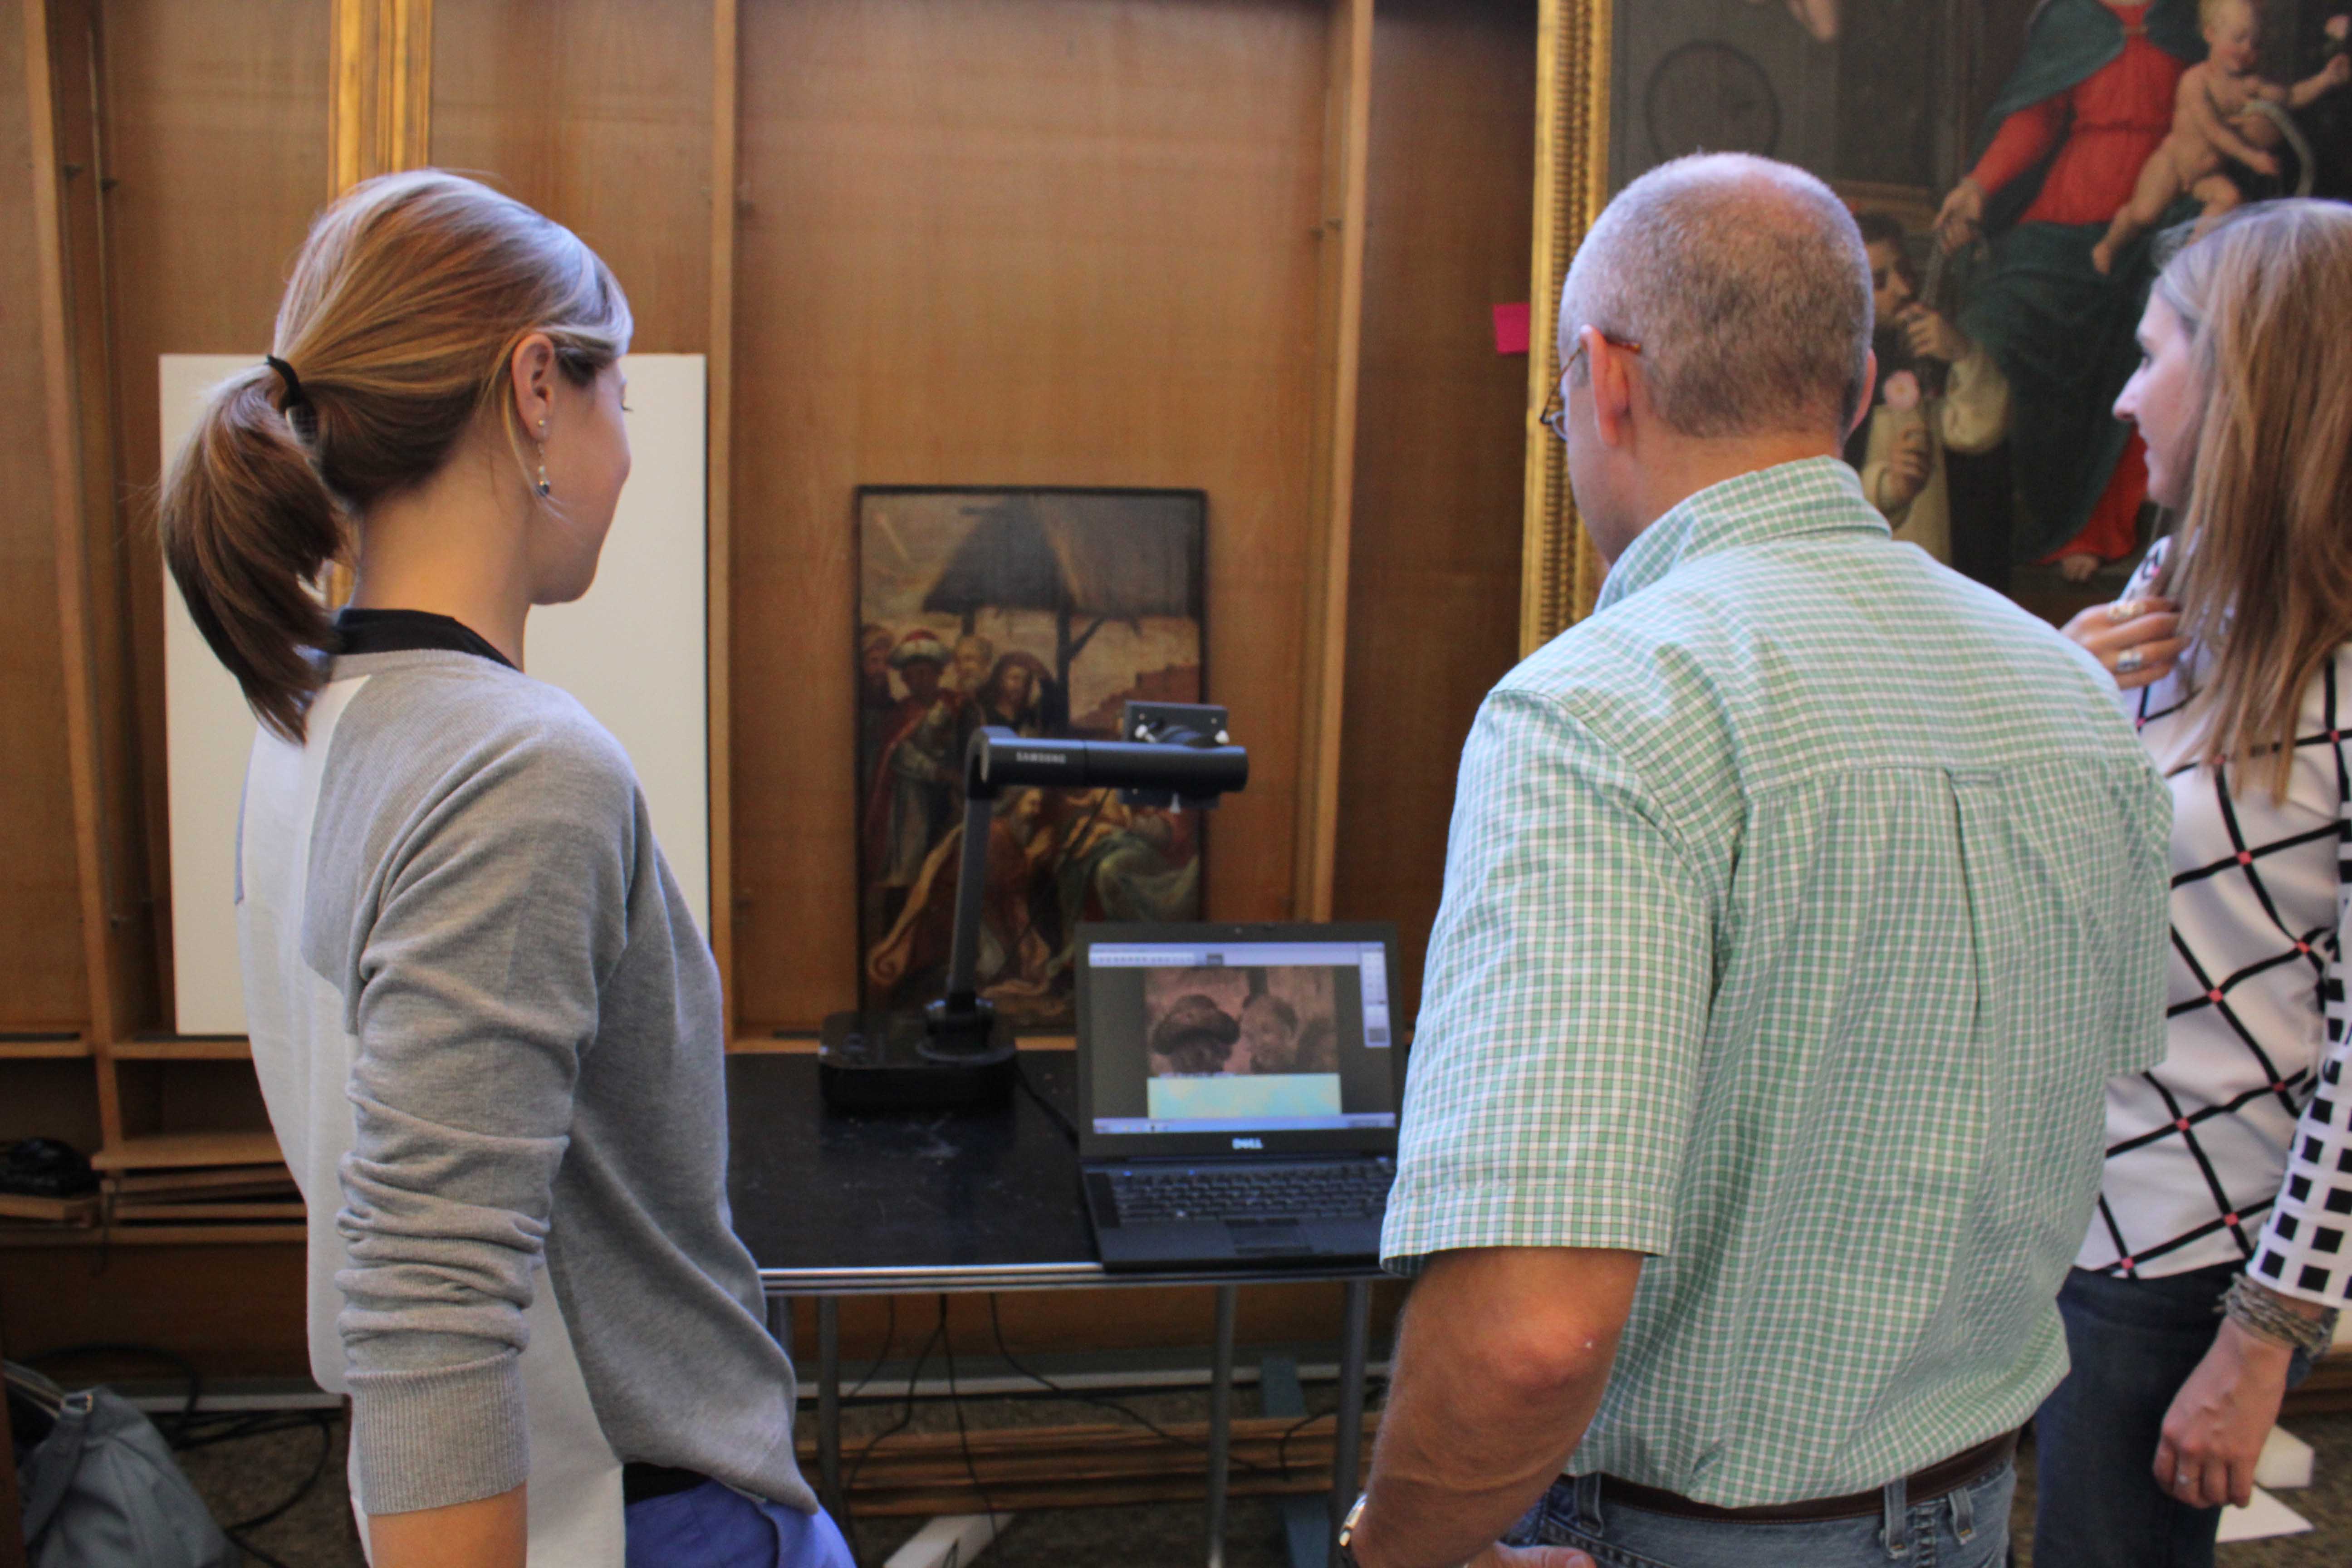
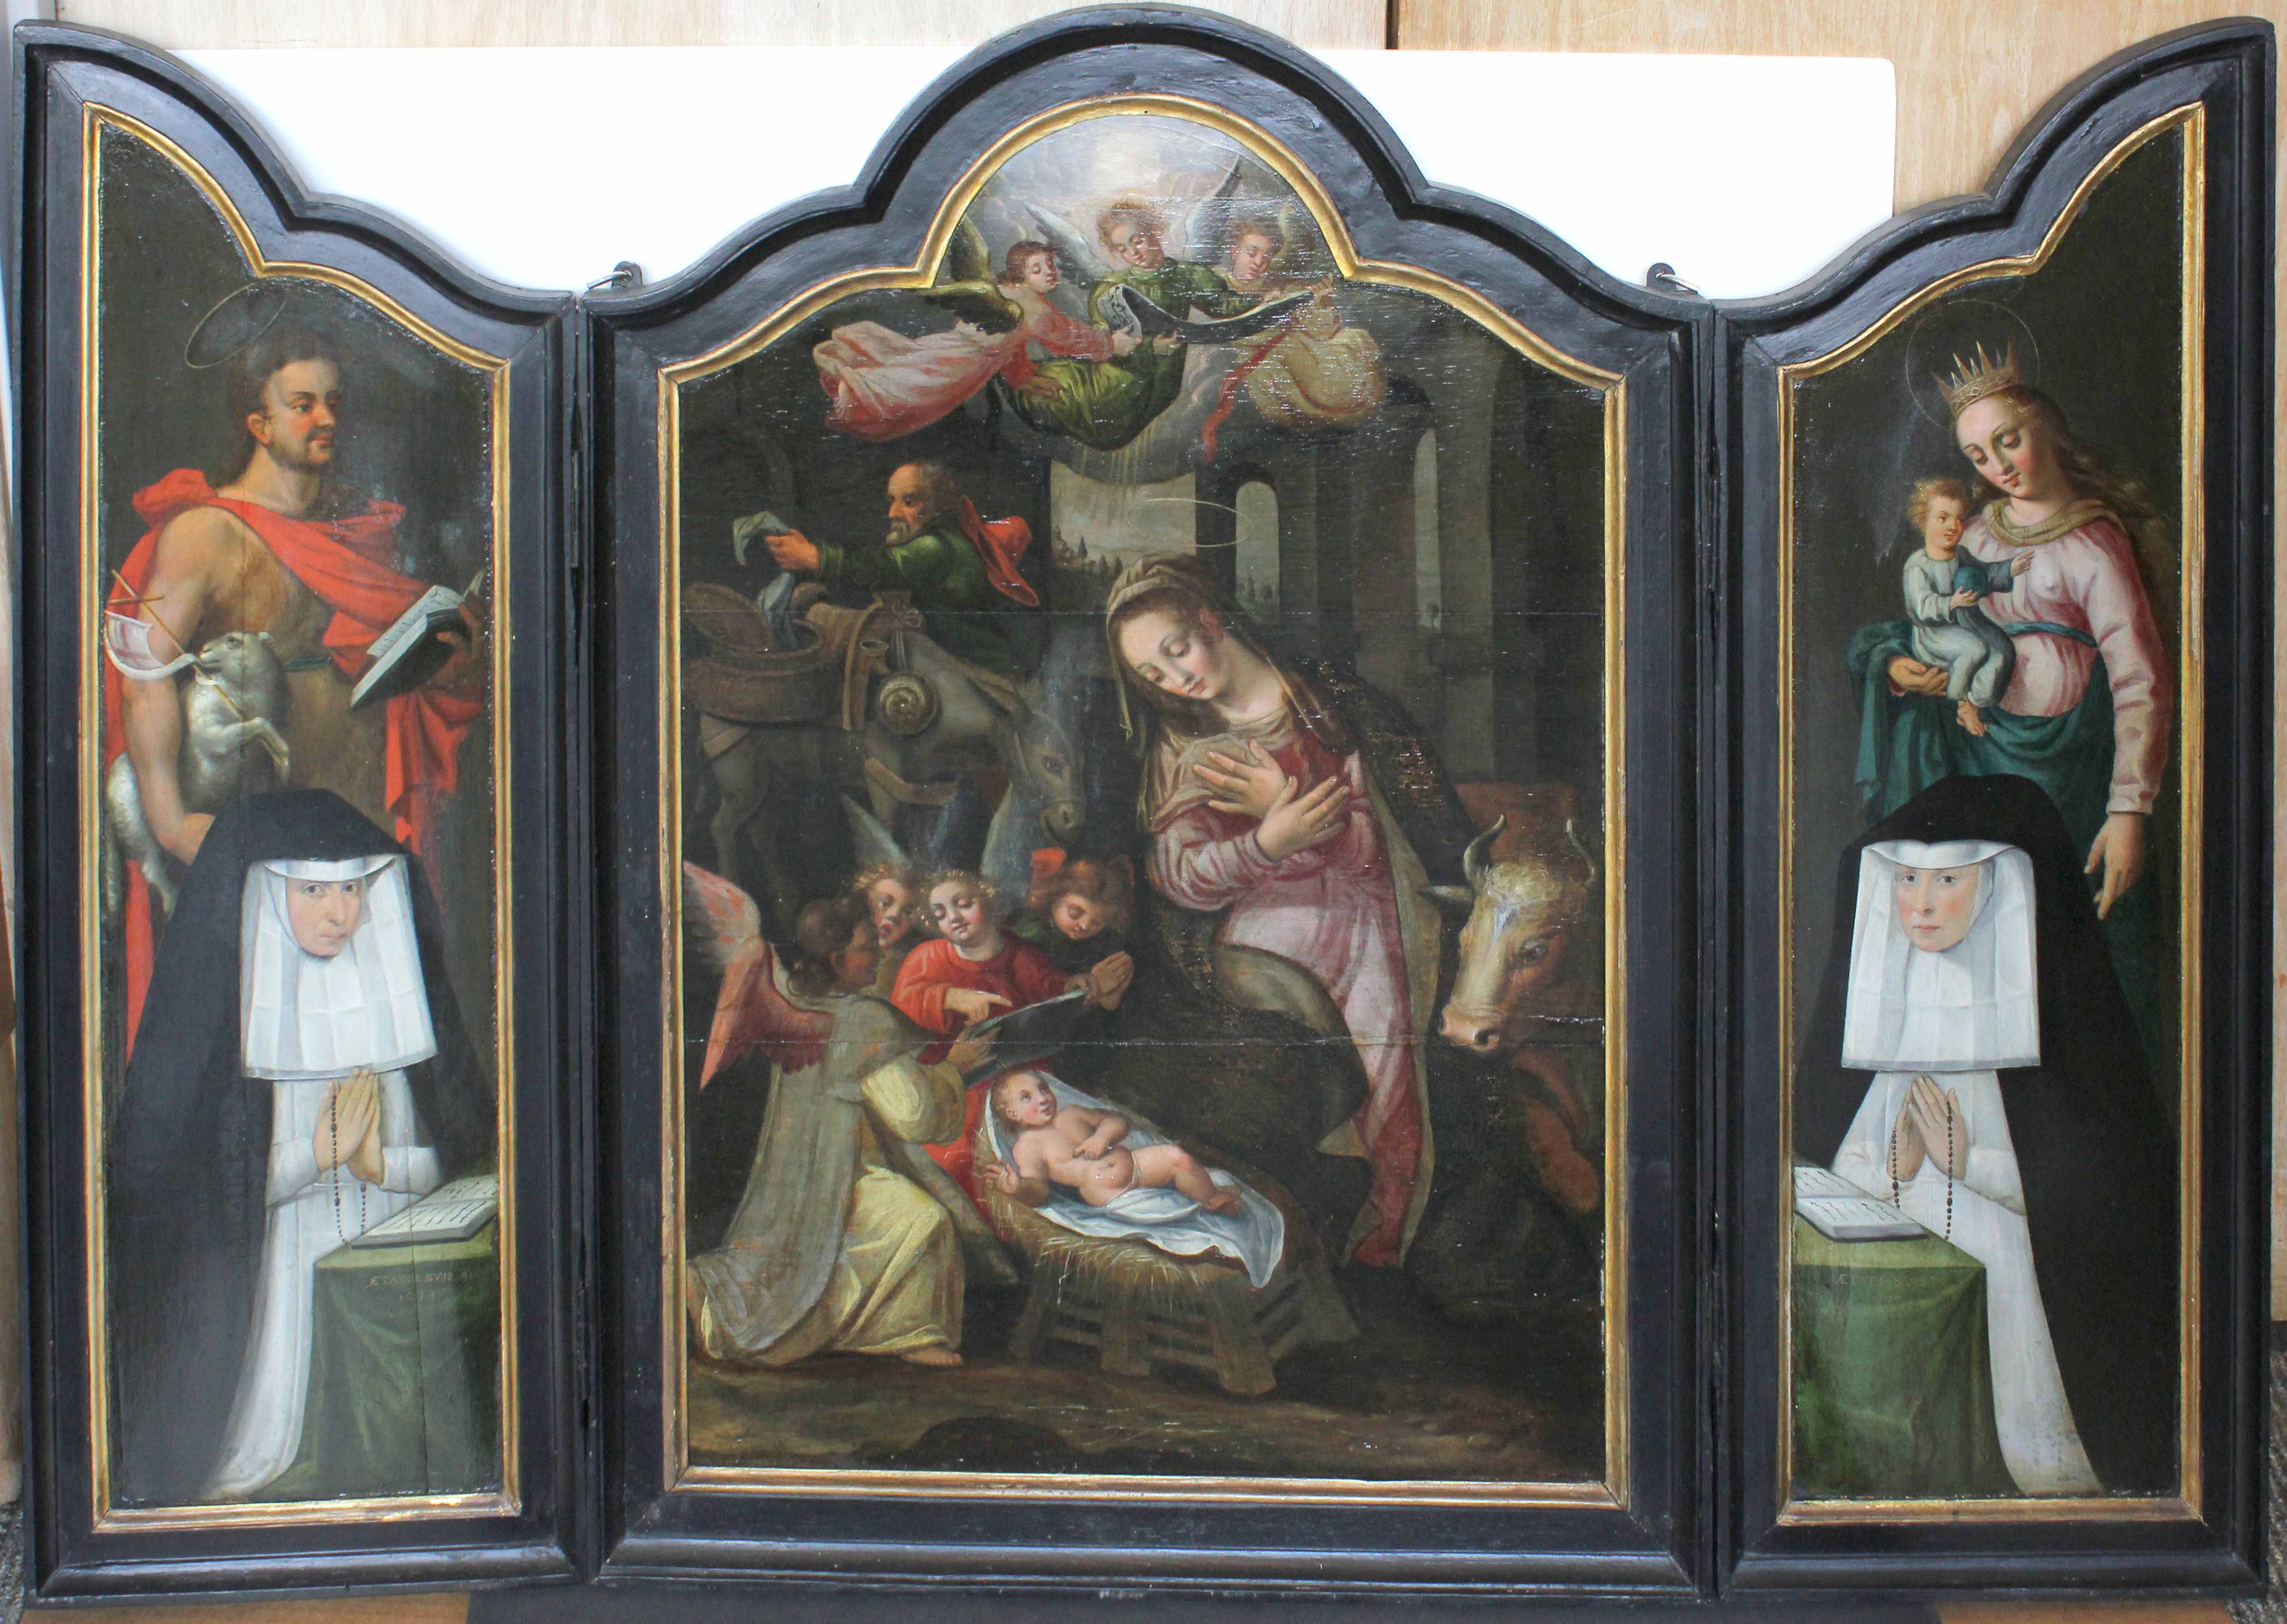
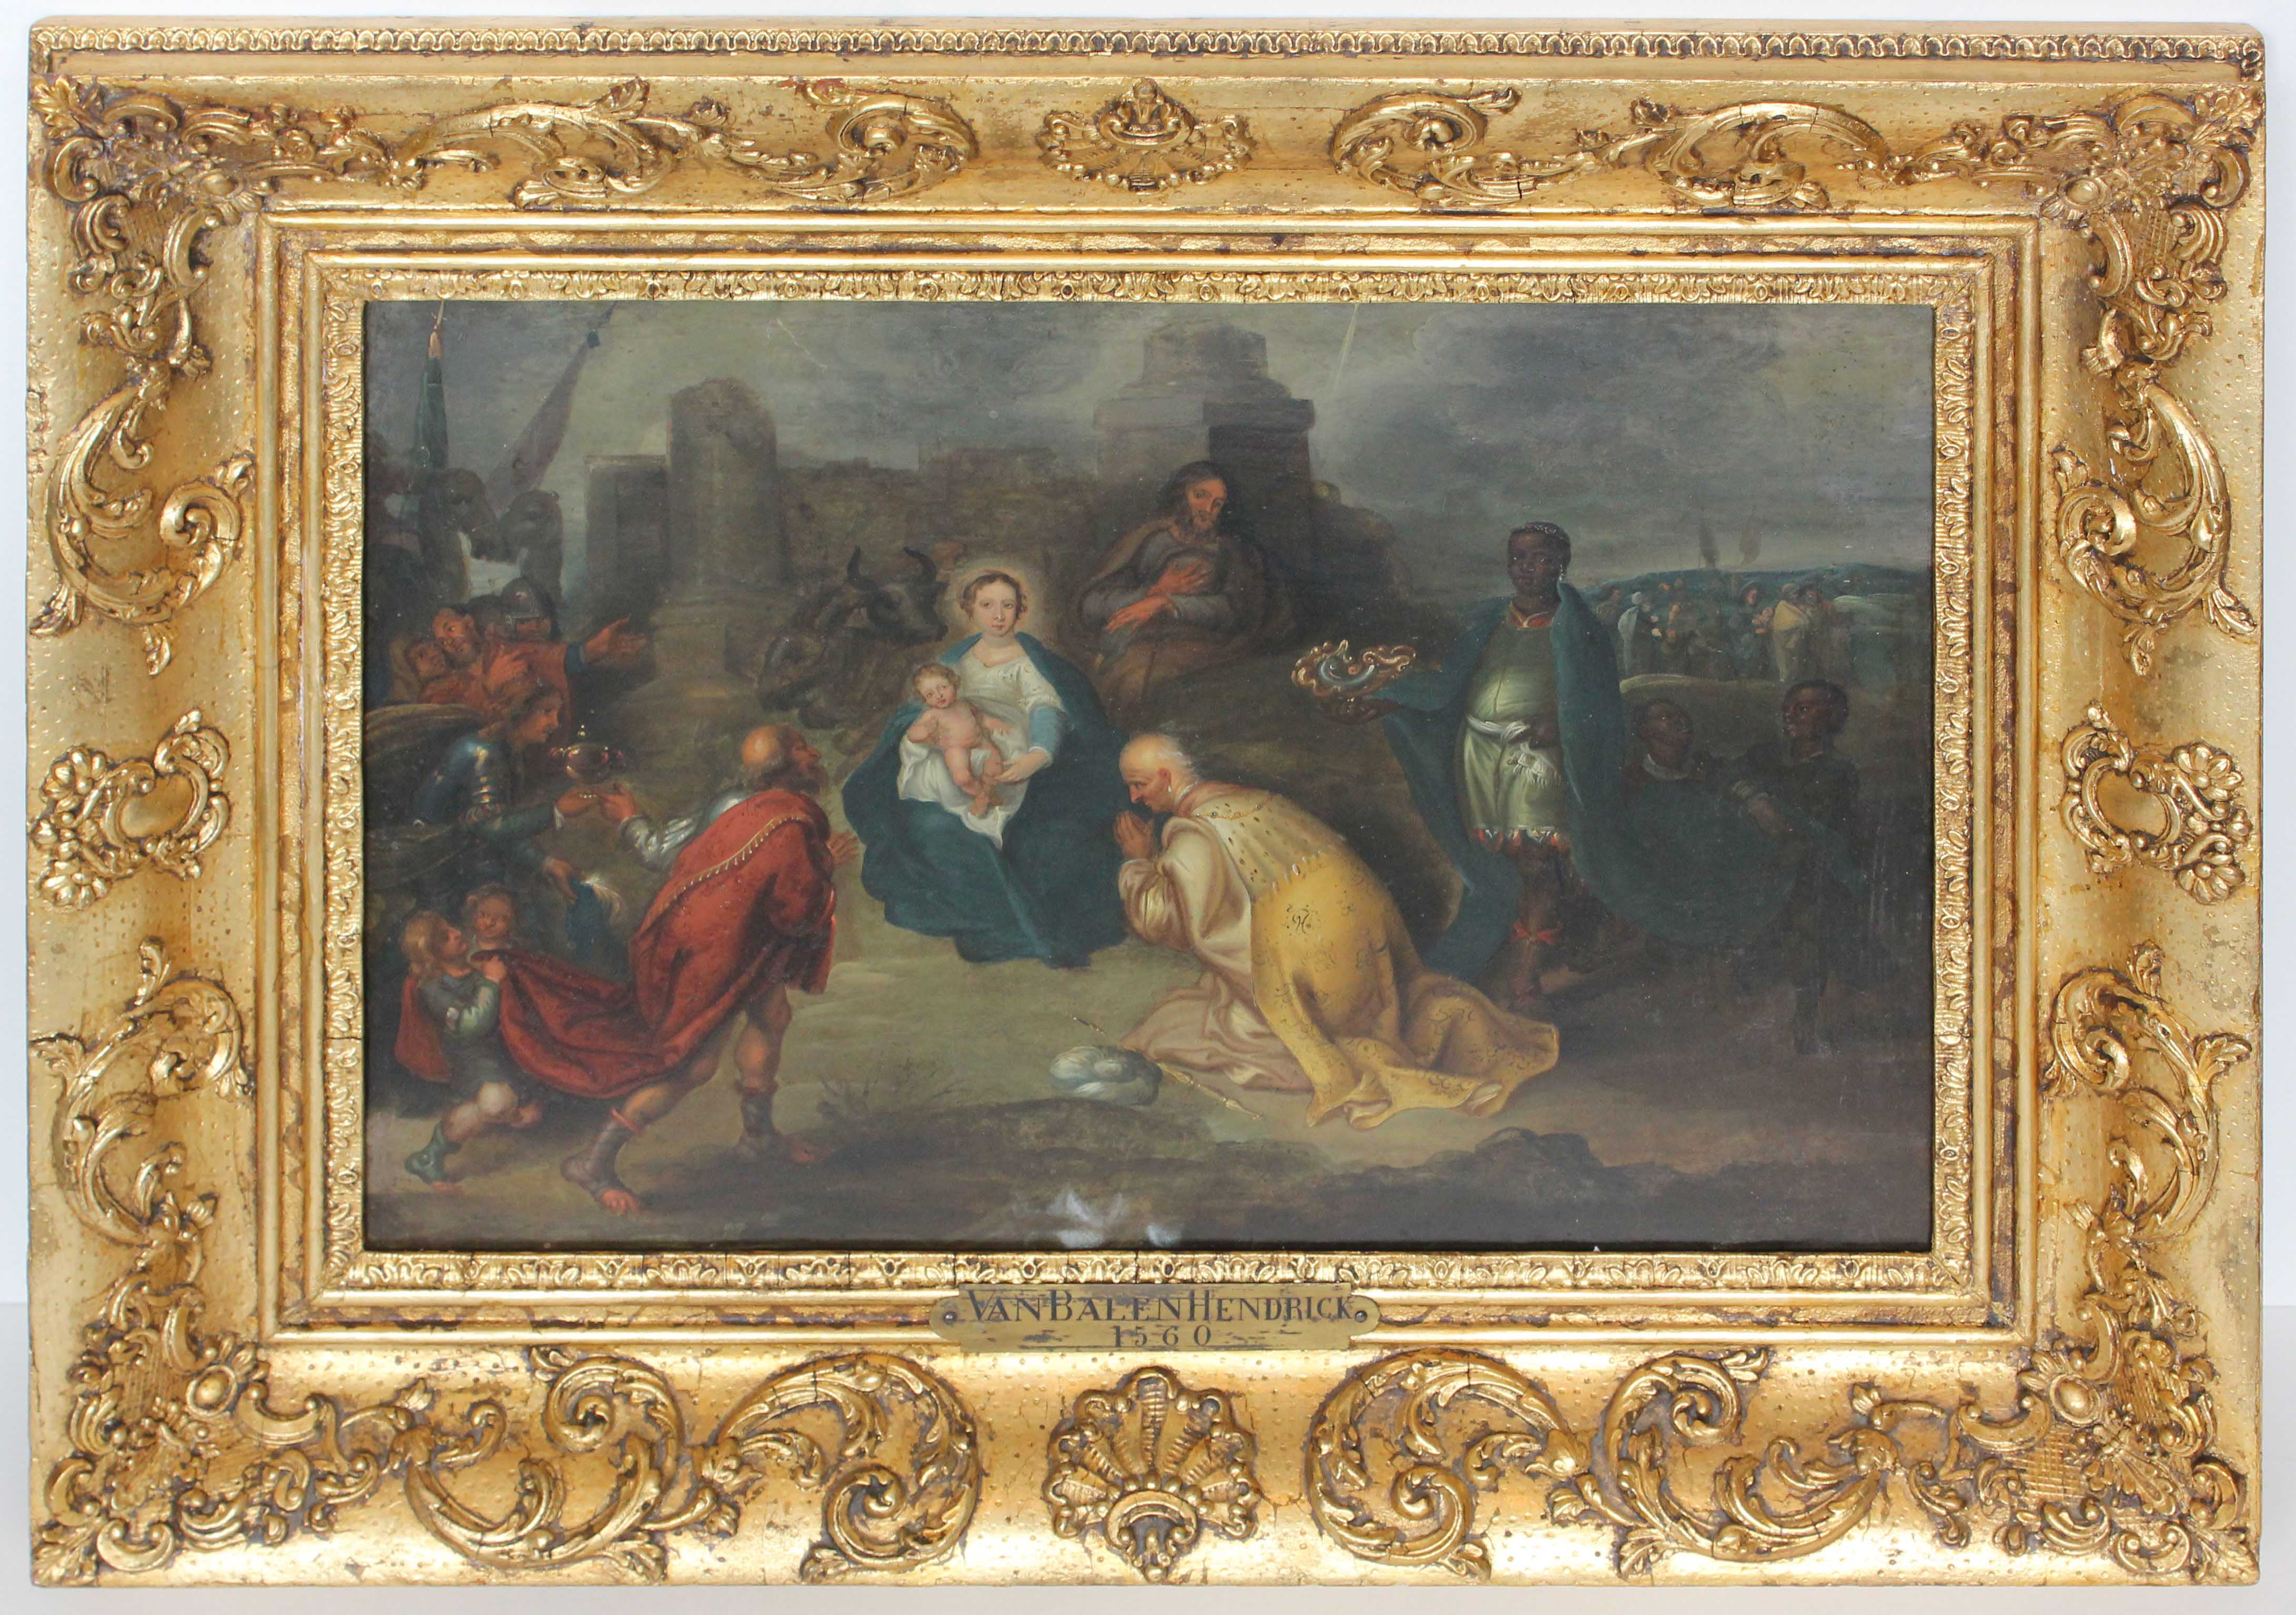
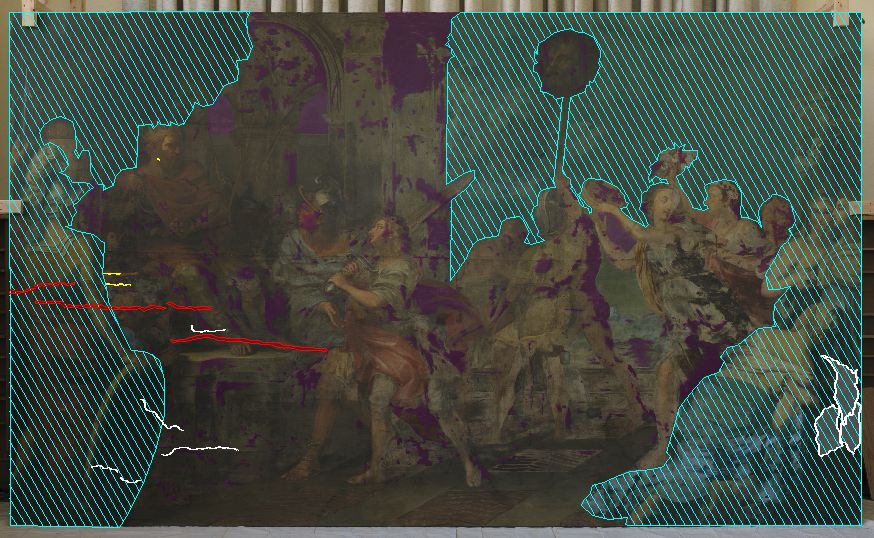
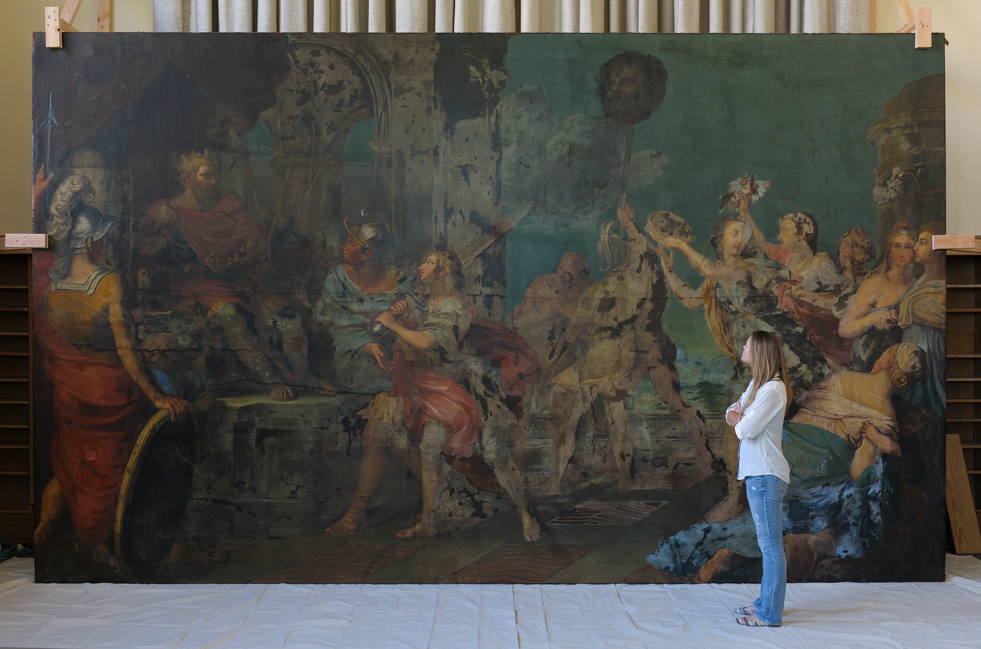
Just a little over two weeks ago, the Conserving a Giant conservation team was anxiously awaiting the arrival of technicians from General Electric (GE) Inspection Services Department, hoping to uncover secrets hidden under the paint using x-radiography.  With the generous support from the Samuel H. Kress Foundation, x-radiography was performed on Triumph of David and other paintings from the Villanova University Collection recently reunited in Old Falvey.

By directing x-rays through a painting and collecting the resulting image on radiographic film, x-rays can be used to highlight what is underneath the paint surface that we see today.  Some of the information that can be collected from the x-radiographs include pentimenti (compositional changes), areas of previous fills or older repairs, as well the location of tears and holes in the canvas or paint layers.

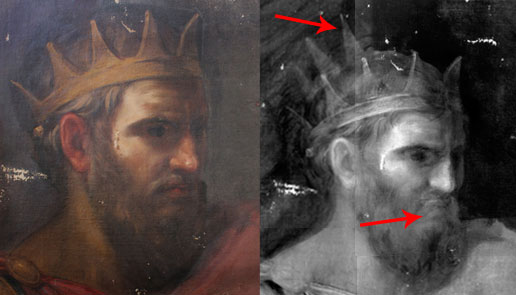
X-rays are shorter in wavelength than ultraviolet radiation, and the energy of that radiation allows the x-rays to penetrate through the paint surface.  The depth of penetration depends on the thickness and the density of the material that the x-rays are moving through.  For example, lower-density materials, such as the canvas or lighter weight elements such as carbon black, do not absorb as much x-ray radiation, and appear darker in the resulting x-radiograph.  Materials with higher densities, like heavy metal pigments such as cadmium red and lead white, absorb x-rays quite easily and show up as white or brighter grey in the x-radiograph.  One of areas that we were especially anxioius to learn more about was what might be located under the shield.  The shield is currently painted a flat black, and in comparison to the highly decorated regalia in the painting.  Conservators noted that there are brush stokes visible through the black paint that do not coincide with what is on the surface of the painting.  The chance to solve the mystery of what lies underneath those brushstrokes was eagerly anticipated.

However, the conservation team first had to create a system for x-raying the painting, to be sure that areas of the painting would not be missed during the capture of over 100 x-ray images.  Another challenge facing the team was being able to complete the analyses of the large-scale painting in a two-day time span.  Prior to the arrival of the GE X-ray team, an alpha-numeric grid system was devised to aid in the positioning of the x-radiographs, ensuring an overlap of 1¾” between each exposure.

Slide1

Schematic of x-rays penetrating through
the painting, and being captured on the x-ray
film. The processed image is seen to the far right.

Dr. Anthony Lagalante and Brad Thorstensen from the Chemistry Department devised a novel method for securing the x-ray film to help maintain the grid system during data acquisition. This involved two steps; first, the location of each exposure was marked on the verso of the stretcher bars and second, a specialized film holder was designed to facilitate the process over a two-day time span.  A 22¾”x24½” x-ray film holder, designed by Thorstensen and Lagalante, was created using sheets of polycarbonate with rare-earth (neodymium) magnets mounted in each corner.  The magnets were padded with a soft synthetic rubber to protect the surface of the painting and an insert was created using 3M VHB tape.  Lines were also taped on to the holder as a guide for positioning the holder in the correct grid pattern. While this system worked well for The Triumph of David, it should be noted the painting is without impasto or cupping which afforded safe contact between the film holder and the painted surface.

For the x-radiographic examination, the GE technicians used a Spellman LORAD LPX160 tube in conjunction with high-resolution 14″x17″ digital-based phosphor x-ray films. Images were captured at 30kV of radiation, which offered better quality in the resulting image.  To avoid any radiation exposure , the GE and Villanova teams stayed outside of the cage during capture times.  To be confident in safety, we also had ND-2000 dosimeters provided by James and Mark to measure the levels of radiation in the room throughout the imaging process.  (A safe level of radiation is 2 millrem per hour or less).   A GE Pegasus CR 50P digital scanner was moved into the space to scan the films as soon as they were exposed.  This allowed for immediate scanning of the films, meaning that we could readily view captured x-radiographs, and that multiple sheets could be used simultaneously.

LiveFeed

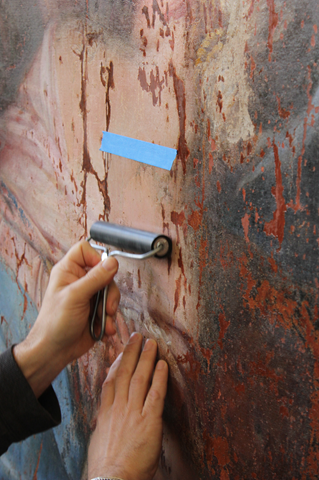
Kristin and Sarah helps align the front guide plate, while
Keara looks on. The green x-ray source is focused onto the
white x using a laser beam. The phosphor film is located just
behind the painting in the same location as the front guide.

Due to the sensitivity of the process, the Reading Room was closed off for the three days of setting up and x-raying Triumph of David and the other paintings in the collection.  However, remote access to the Live Feed allowed the general public to follow along as we made each capture across the entire surface of the painting.

At the end of the first day, some of the captured x-radiographs provided insight in to the moving of David’s hands on the sword, and even the indecisiveness in the placement of Abner’s thumb.  The second day was spent reviewing the images and recapturing films that had too much excitation (“blown out” with too much white) or too little excitation (too dark).

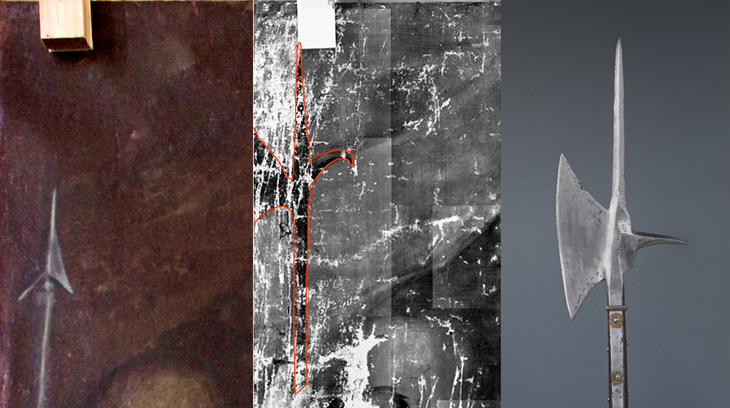
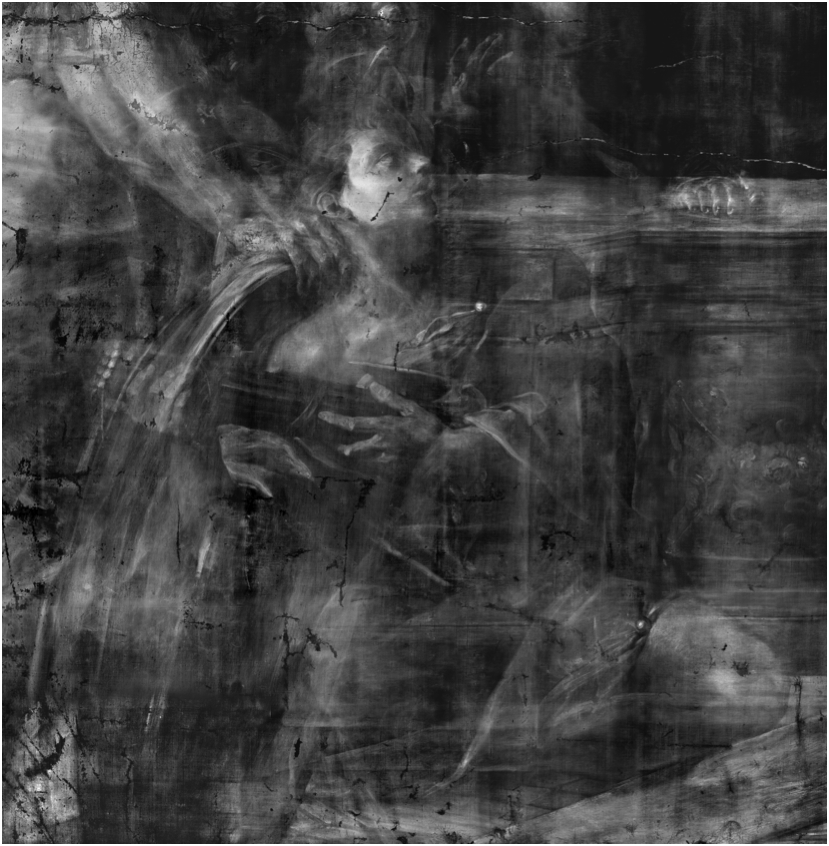
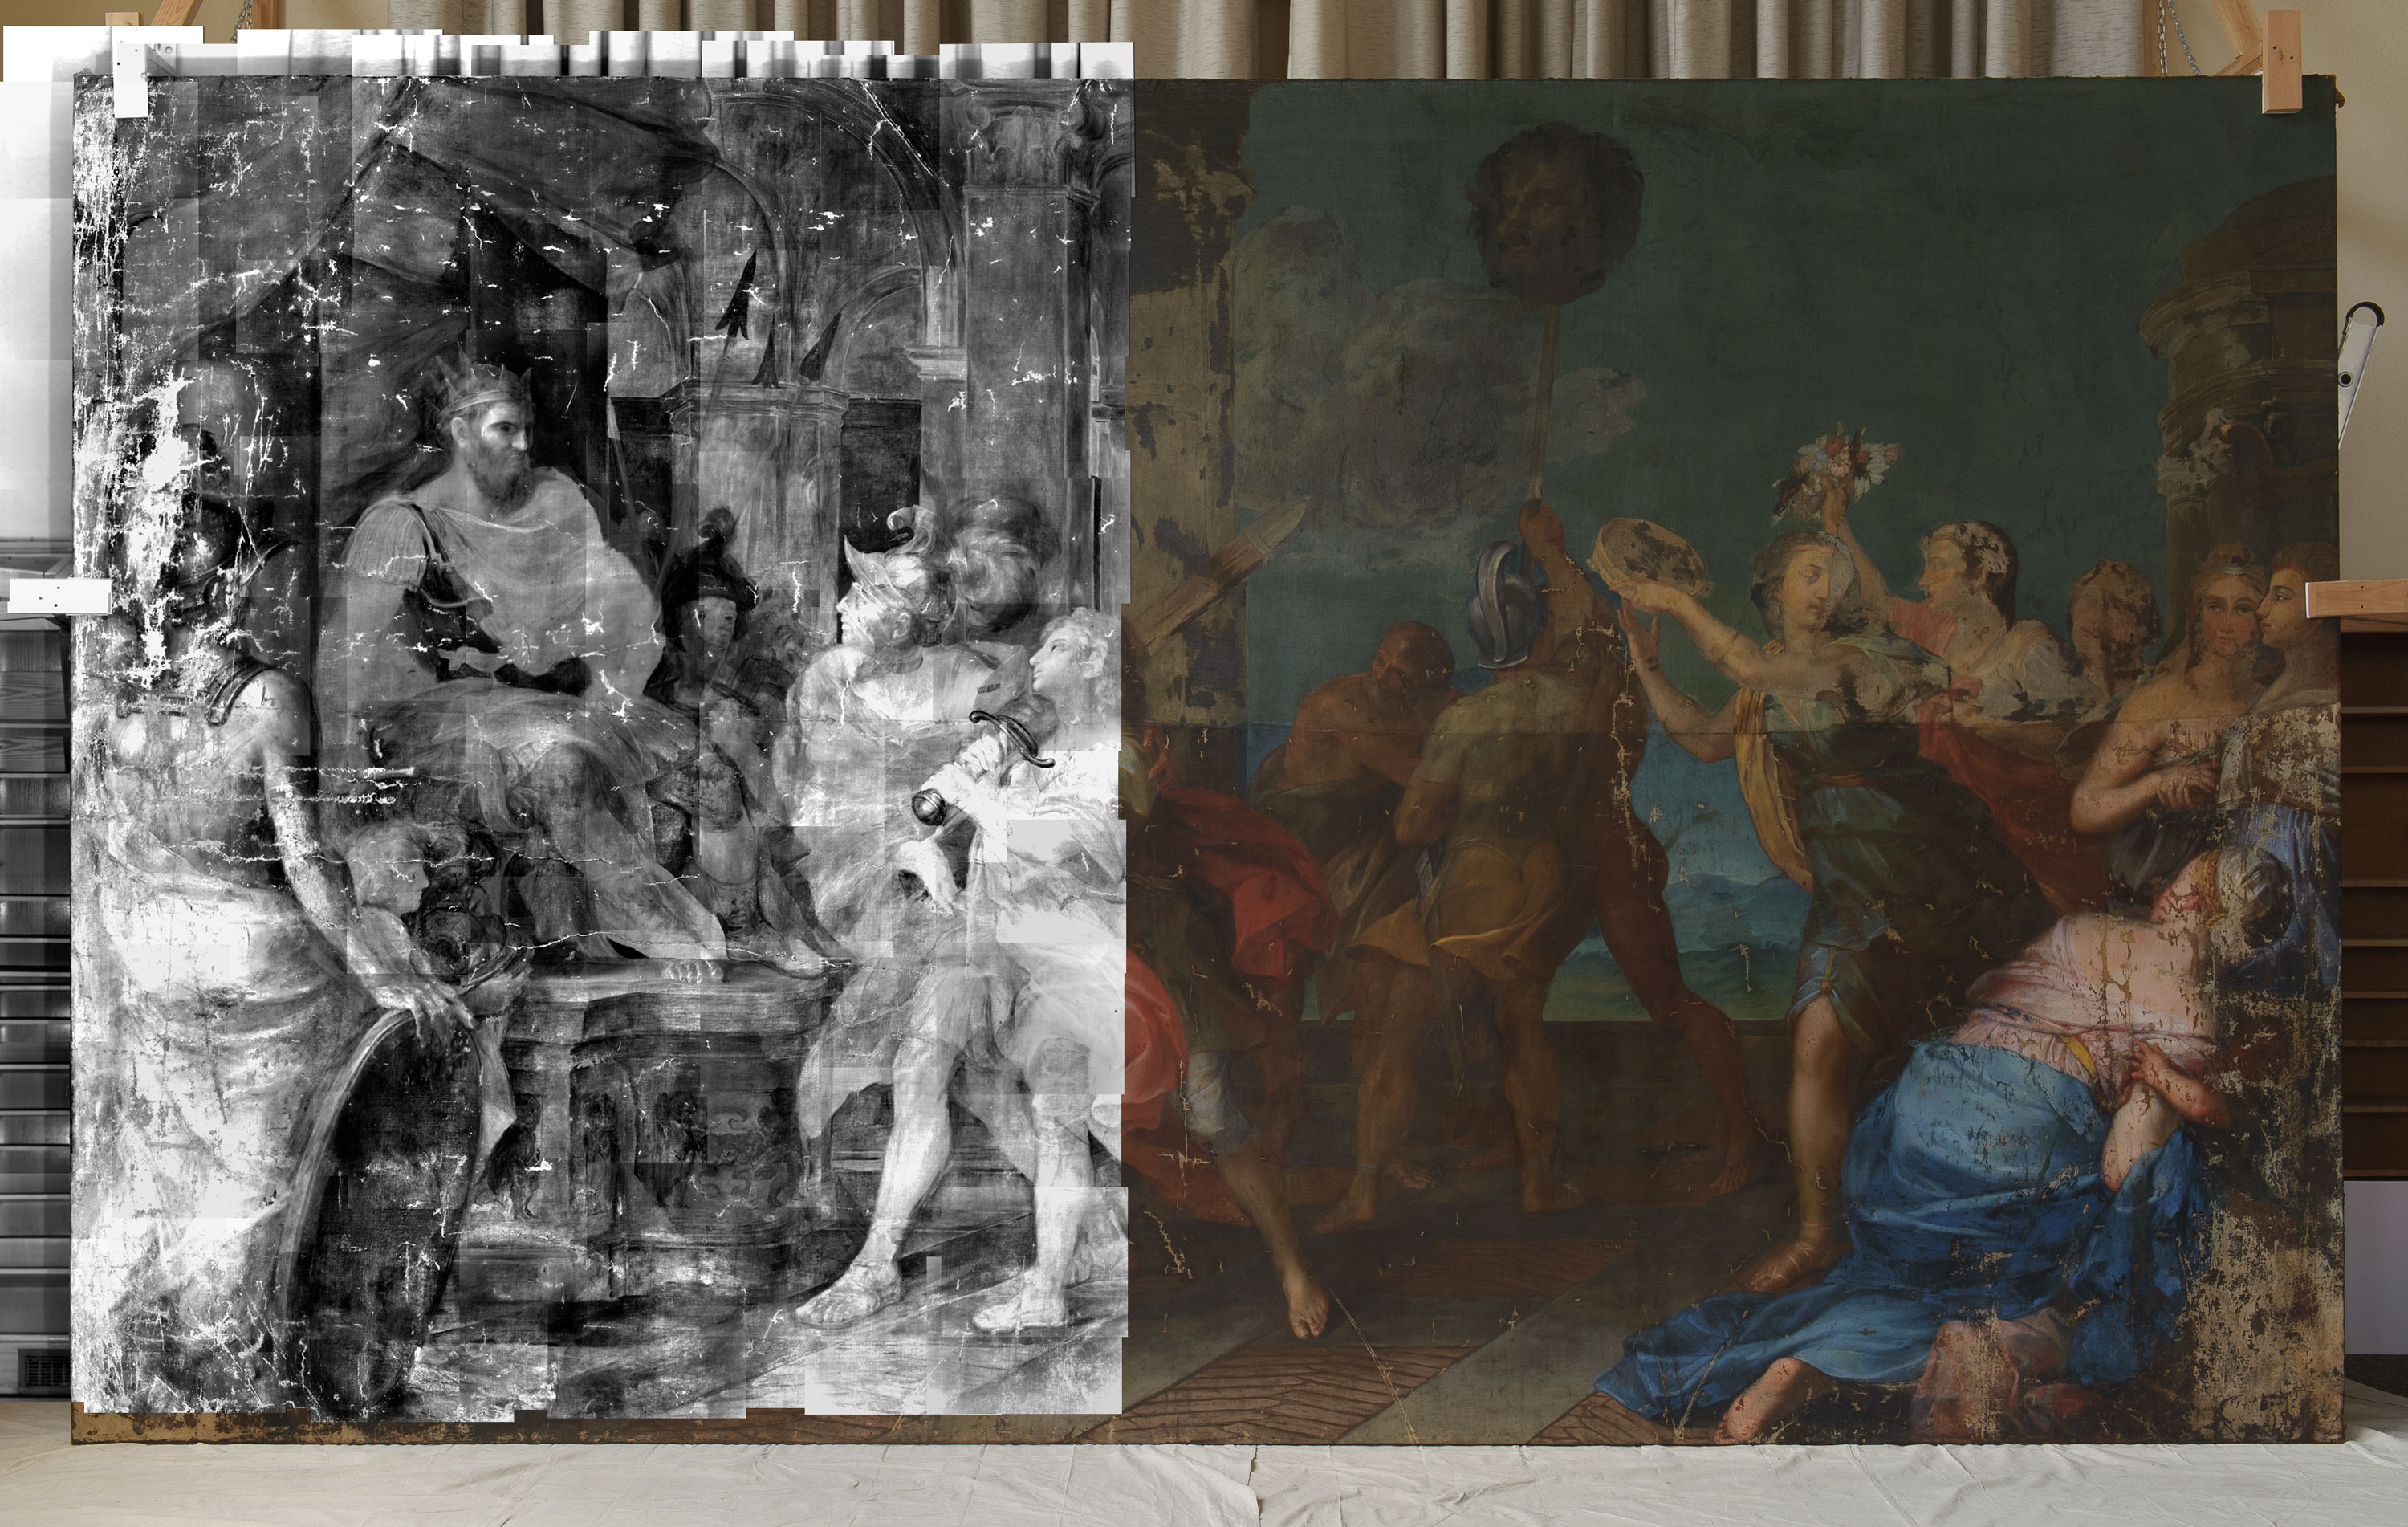
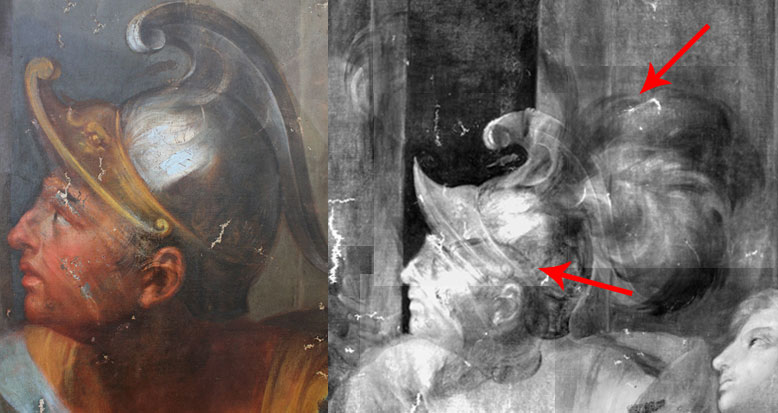
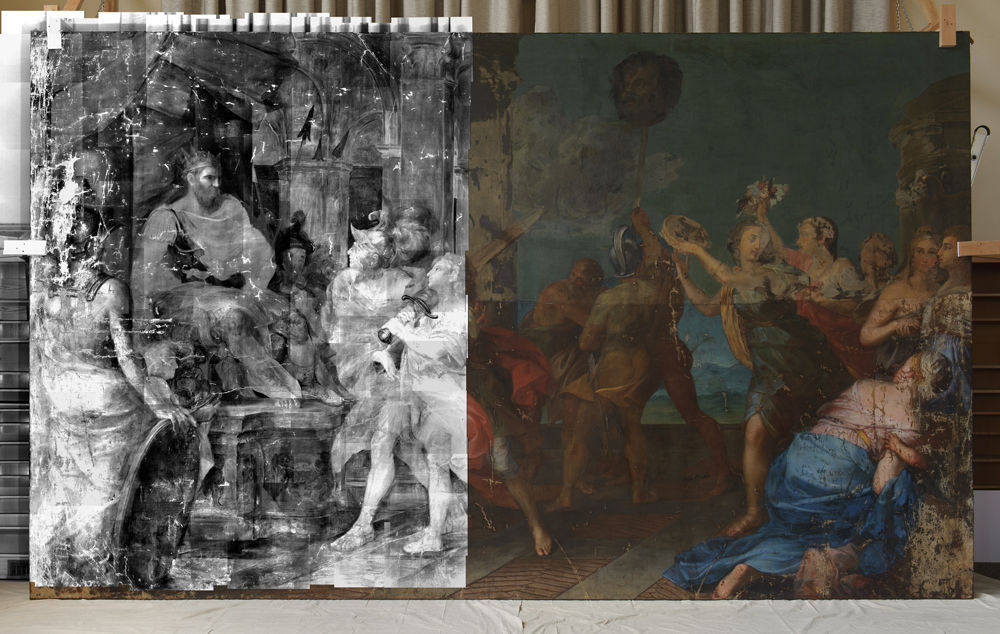
But the greatest discovery was found in the paint layers beneath the dark shield.  In reviewing the captured images, a strange hand was seen holding some rod-like sticks, an object that was eventually determined to be a fasces.  Fasces are bound bundles of wooden rods equipped with an axe blade and were often associated with magisterial power in ancient Rome (there is even a fasces on the US dime).  Currently the team is faced with a new question: why was this man initially included in the composition and, more importantly, why was he painted out?

Figure in shield x-ray

X-radiograph composite image. The figure is holding a
fasces, and the axe head can be seen just above the left
hand of the hidden man.

Sheild area

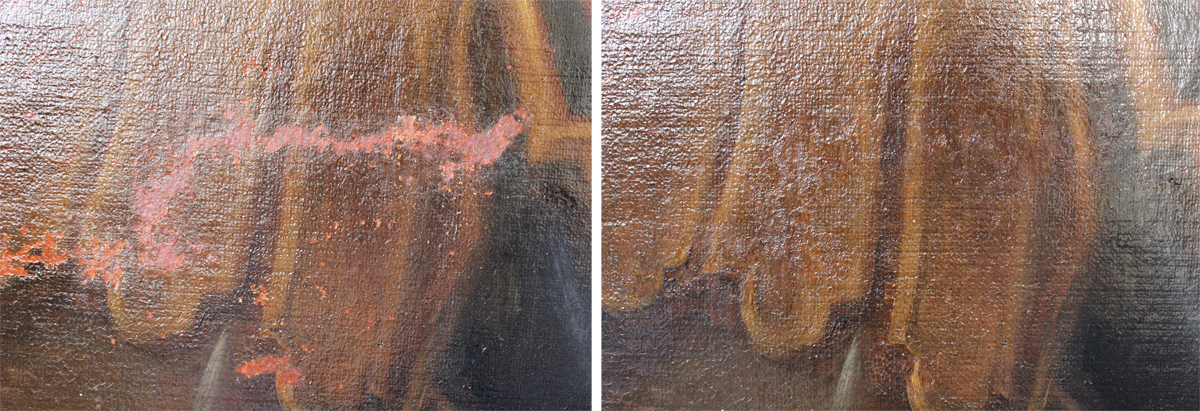
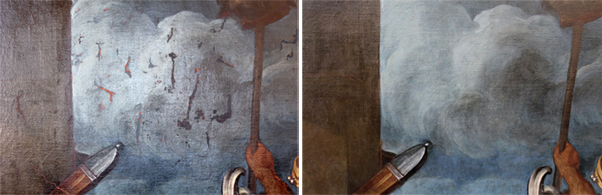
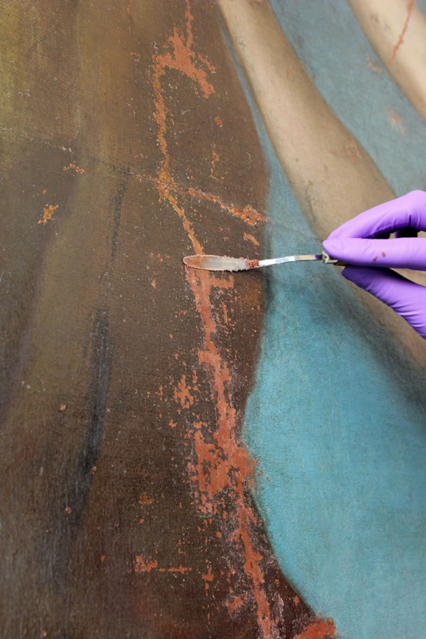
How the sheild area appears today.


In the end, over 120 images were captured, which lead conservator Kristin deGhetaldi compiled into the final image seen below. To learn more, please come visit Old Falvey, as we are very excited to share the discoveries made while examining Triumph and the other paintings in the Ruspoli collection with x-radiography!

Pietro During      Composite

We will leave you with the composite image of all of the x-radiographs taken of the Triumph of David. Looks amazing. Leave a comment below if you can see any differences between the painting and its x-radiograph!!

A Collection Reunited

  • Posted by: Kristin de Ghetaldi
  • Posted Date: September 9, 2014
  • Filed Under: Conservation

IMG_0692

The Triumph of David is one of several works of art belonging to Princess Ruspoli’s collection, once an incredibly rich and vast group of paintings, furniture, sculpture and other artworks that were housed in her castle located in Nemi just outside of Rome.  Research on the history of the collection has revealed that the Princess feared for the safety of her precious collection as the world became engulfed in the turmoil of the Second World War.  In a moment of great haste, three crates were filled with select pieces of art and shipped back to the United States; two were sent to her family in Oak Hill, Georgia, and one to New York City where the Princess had an apartment.  Ultimately these artworks would become the last surviving pieces of her vast collection, as the war left much of her castle in ruins with the German forces destroying the remaining artifacts as they were forced to retreat from the town of Nemi.

Years later, Princess Ruspoli befriended Father Falvey who was making plans to build a new library at Villanova University (today known as Falvey Memorial Library).  She decided to donate several of her paintings to adorn the walls of the new library and to be enjoyed by future generations of students, faculty, and the general public.

IMG_0687

While the Triumph of David (attributed to Pietro da Cortona) has remained on the wall of the library since its arrival in 1950, the University has not had sufficient space to display all 30 paintings donated by the Princess. This past week, however, recent efforts were made to re-unite this small collection, bringing many of the works out of storage for examination for the first time in several decades.

Many of the paintings were delivered, both from storage and from various locations around campus. Upon their arrival, the conservation team was tasked with documenting each of the works, as well as constructing a suitable temporary storage space within the Old Reading Room in Falvey Library. The cage seen above is very similar to storage space in many museums, as the paintings can be safely positioned once they are fitted with the proper hanging hardware. Other paintings are currently being stored vertically in wooden recesses lined with Volara ® (a closed cell plastic foam made from polyethylene), protected with pieces of foamcore that have been cut to size.

The conservation interns and volunteers have created new records for each of the paintings, including information relating to construction and condition, evidence of past restoration work, visible evidence of damage, and other details that could help with future provenance research.

High-resolution photographs were taken of each of the paintings and notations have been made to indicate areas of loss, damage, and repair that can be seen in visible light.  Oftentimes un-original areas can be easily identified in raking light, which can be achieved simply by looking at the painting from one side, parallel to the plane of the canvas. Areas that have been repaired or heavily overpainted can reflect visible light differently than the original surface.  The paintings were also observed under ultraviolet (UV) light, which can often indicate locations of previous restoration.  Oil paint and/or overpaint applied in recent years can appear very dark under UV light while aged oil paint and varnish tends to auto-fluoresce.  Some of the pieces were also viewed using an Infrared camera (as seen in the photo below) which can be used to reveal underdrawings or preliminary changes beneath the visible paint layers.  All of this information has been compiled into separate documents for each painting in the collection and will remain accessible to future generations of scholars and students.

IMG_0652IMG_0654

A basic overview of each painting’s current condition is crucial in order to preserve the collection. Documentation will prevent items from being lost even if they are not displayed in the same location, and condition reports can indicate which works might benefit the most from being treated by a conservator, and whether a painting can be safely put on display.

Many of the works are in excellent condition, and the conservation team is especially excited about a few of the pieces. Most notable is an eight foot high oil painting depicting “Madonna of the Rosary,” that is currently attributed to Cosimo Daddi, which can be seen in the overall photo at the top of the page.  Other works of interest are the Sassofferrato portrait of the Madonna, shown to the left of the Daddi, a Flemish oil on panel triptych, and a large oil on copper, shown below.

1950.RUS.27_004_(edited)1950.RUS.4_002_(edited)

Students at the University are encouraged to come see the new collection pieces, and research on any of the works is highly encouraged. Princess Ruspoli donated her art with the intention that it be studied, and the reunion of the works is the first step towards achieving that goal once again.


Allison Rabent

Conservation Intern

Examining Preliminary Sketches and Compositional Changes using Infrared Reflectography

  • Posted by: Kristin de Ghetaldi
  • Posted Date: August 12, 2014
  • Filed Under: Conservation

IR-Mosaic-for-Blog

Pietro da Cortona and other artists of the seventeenth century would often sketch objects, landscapes, and figures during the initial stages of oil painting.  Most preliminary sketches (whether they are done using a wet medium like oil paint or a dry medium like charcoal) are not evident to the naked eye as they are often covered by several paint layers.  Through the use of infrared reflectography (IRR) the conservation team was able to reveal portions of the preliminary sketch and compositional changes in Pietro da Cortona’s Triumph of David.

The IRR analysis was a collaborative effort between Washington and Lee University and Villanova University.  In order to examine this large-scale painting, a series of IRR images were collected using an Indium Gallium Arsenide (InGaAs) instrument which is sensitive within the 900-1700 nm range (near infrared).  When exposing the paint surface to infrared light, certain pigments appear partially or completely transparent. Carbon blacks will still appear dark in IRR because these pigments readily absorb infrared light.

The depth to which infrared light penetrates depends on the type of paint, the thickness of the paint layers, and the wavelength of infrared exposure.  In some cases, underdrawings or preliminary sketches may not be visible using IRR, as is the case when an underdrawing has been done using white/red chalk or paint that is not rich in carbon black.  For this reason, additional imaging techniques – such as multi/hyperspectral imaging and X-radiography – can contribute to the analysis of a painting’s underdrawing.

Once the IRR images are collected, they must be imported into image processing software and manually stitched together.  The product of these stitched images is referred to as an infrared reflectogram mosaic.  Below are images showing the mosaicing process for the Triumph of David.  When completed, this mosaic will be a compilation of 220 IRR images


King-Saul-IR

King Saul’s crown was initially placed much higher and the contours of his mouth, beard, and face have been altered (originally, Saul was depicted in profile).

Abner-IR

Abner’s helmet was originally placed much lower and was embellished with a very large feather plume.

David-IR
David’s hand had been placed higher on the sword (above where the guard presently resides).  The sword guard and pommel are especially prominent as they contain a significant amount of carbon black pigment.


Keara Teeter

conservation intern


van Asperen de Boer, Jan R.J. “Reflectography of Paintings using an Infrared Vidicon Television System.” Studies in Conservation 14 (1969): 96-118.

Bomford, David, ed.  Art in the Making: Underdrawing in Renaissance Painting, National Gallery London Publications; Yale University Press, 2002.

MacBeth, Rhona. “The Technical Examination and Documentation of Easel Paintings.” In The Conservation of Easel Paintings, edited by Rebecca Rushfield and Joyce Hill Stoner, 296-300. Routledge: London and New York, 2012.

Recent Developments in the Technical Examination of Early Netherlandish Painting: Methodology, Limitations and Perspectives (M. Faries and R. Spronk, eds), Brepols Publishers.

Real, William A.  “Exploring New Applications for Infrared Reflectography.”  The Bulletin of the Cleveland Museum of Art 72 (1985): 390, 392-412.

Saunders, David, Rachel Billinge, John Cupitt, Nick Atkinson, and Haida Liang.  “A New Camera for High-Resolution Infrared Imaging of Works of Art.”  Studies in Conservation 51 (2006): 277-290.

Taft, W. Stanley Jr., and James Mayer. The Science of Paintings. Springer: New York, 2001.

Generous Support from the Samuel H. Kress Foundation Allows Conservation Team to X-Ray “Triumph of David”

We are most pleased to announce that, in May 2014, the project Conserving a Giant: Resurrecting Pietro da Cortona’s “Triumph of David” was awarded a substantial grant from the Samuel H. Kress Foundation. These funds will be utilized in a number of ways, to help both produce and disseminate further information knowledge about Villanova University’s large canvas – and no doubt about seventeenth-century Italian painting more broadly – to in a number of arenas and in a variety of audiences, both general and academic. 

The Kress foundation praised the interdisciplinary nature of the project, which has involved thus far a number of department and offices at Villanova, and the participation of scholars and students of art conservation, chemistry, history, and art history. We are very happy that this support will be used to further specifically interdisciplinary investigations, and that it will continue to allow Villanova faculty to engage this painting in both teaching and research, with both undergraduate and graduate students, and with both the public at large and the wider academic community.  This grant will allow us to involve even more students, professors, and departments on campus, and it will enable us to develop further cooperation with art historians of Roman Baroque painting, art conservators, and scholars at institutions with connections to the painting and its donor. 

Most immediately, the Kress funding will allow for technicians from General Electric to perform X-radiography and other technical analysis on the gigantic canvas, and other early modern paintings in Villanova’s collection. Several large canvas paintings by Pietro da Cortona were examined using X-radiography during a technical study in 1997-8, revealing characteristic unique to the artist’s working method.  X-radiography of the Villanova painting will allow the conservation to establish a dialogue with other scholars and art historians who are more familiar with Pietro da Cortona as well as artists related to his circle.

With this grant, members of the Conserving a Giant conservation team and Falvey Library will collaborate with Villanova University’s Computing Sciences Department and with UNIT (the IT Department) to create a “webexhibit” exploring the Triumph of David. This website will enable members of the conservation team as well as chemistry and art history faculty and students to compile, organize, and share their research with a wider audience. The “webexhibit” will remain a permanent fixture on Villanova’s server, thus providing an attractive and interactive site for prospective students, outside scholars, and the general public, and moreover, serving chemistry and art history courses for years to come.

Funding from the Samuel H. Kress Foundation will allow members of the team at Villanova to travel to Rome in spring of 2015, to view a number of frescoes and canvas paintings by the artist, and by important members of his workshop, to gain further insights about his painting methods.  We will be meeting with art historians and conservators who have worked on seventeenth-century painting, to learn from them and, with what we have discovered through conservation and research undertaken at Villanova, to share our own experiences and knowledge. The grant, together with support from Villanova University, will additionally fund an international, interdisciplinary symposium investigating Pietro da Cortona’s workshop in seventeenth-century Rome. This symposium will involve a number of scholars and students from various fields who have contributed to the Conserving a Giant project, and we will be able to invite eminent scholars of Baroque painting. The symposium will serve as both a culmination to the multi-year conservation project, and at the same time a new beginning, with new knowledge and insights shared among and between established and emerging art historians, scientists, and conservators, and, indeed, with all of the Villanova community.    


– Tim McCall

Professor of Art History

Villanova University


Pentimenti in “The Triumph of David”

  • Posted by: Ellen Nigro
  • Posted Date: April 11, 2014
  • Filed Under: Conservation

Pietro da Cortona ran a prominent workshop and supervised a large group of assistants. Since Pietro was also a fresco painter who was in high demand, he would often have to leave behind his studio assistants to complete commissions and other projects.  This may explain why so many of Cortona’s oil paintings possess several compositional changes.  Assistants may have struggled with certain sections of a painting and when their master returned Cortona himself may have altered details or large areas of the canvas.  These changes made during the painting process are known as pentimenti, and Pietro’s workshop is particularly known for them.

Throughout the cleaning stage of this treatment, the conservation team revealed details previously hidden by layers of degraded varnish and thick overpaint, including evidence of pentimenti.  There are several ways conservators can tell there are pentimenti present under the final paint layer.

impasto

Above: Impasto that suggests pentimenti.

Often brushstrokes in the paint layers do not appear to match up with the visible image.  If a thin layer of paint is applied over thick paint layer containing texture, brushstrokes from the layer beneath can often be seen up close and in raking light (light shown across the surface at an oblique angle).  The image of Abner’s hand demonstrates brushstrokes that are perpendicular to the direction of his fingers, most likely an earlier manifestation of his red drapery.  The hand was not painted thickly enough to hide the texture from the previous paint layer, and therefore, evidence of the drapery remains.

pentimenti

Top: A change in foot position.
Bottom: Plumage above Abner’s helmet.

Earlier compositional elements can show through the final paint layer as well.  As oil paint ages, the paint film becomes transparent due to crosslinking and the formation of metal soaps.  After hundreds of years, the viewer may be able to see evidence of underlying forms peering through the paint on the surface.  Pentimenti can sometimes reveal how an artist would adjust certain compositional elements like hands, feet, and faces.  Several figures in The Triumph of David appear to have extra feet because of this phenomenon.  For example, a ghost-like foot became more visible after removal of the degraded varnish, indicating the artist’s initial position of the foot before it was repainted (what we see today).  Similarly, swirly white strokes above Abner’s helmet suggest that it originally possessed a feathered plume before it was covered over with the background architecture.

pentimenti blue

Above: Areas of abrasion that reveal changes in the blue robe.

Areas of abrasion can also provide evidence of pentimenti.  If the top paint layer suffered from over-cleaning or flaking over the course of the painting’s life, the viewer eventually sees the color of the initial paint layers beneath.  For example, the blue robe of the crouching woman in the image to the right appears to have been completely redone by the workshop.  The dark blue paint exposed in the losses throughout the pink robe and along the outer left contour tells us that the blue portion of the robe was originally much higher and extended out to the left.

Cleaning a “Giant”

  • Posted by: Maggie Bearden
  • Posted Date: January 6, 2014
  • Filed Under: Conservation

CleaningBlog1    How to remove unoriginal varnish and overpaint from a 17th-century oil painting?  Step 1: Obtain a graduate degree in art conservation; Step 2: Carefully perform cleaning tests using a range of organic solvents, gel systems, and aqueous methods; Step 3: Choose a system that can be safely administered without causing harm to the underlying original paint layers.

The removal of degraded coatings and discolored overpaint has long been a  controversial topic in the history of restoration.  Today, conservators have access to a wide range of materials and solvents and are equipped with a substantial background in chemistry.  Restorers of the past were limited by what they had access too, which unfortunately included the use of harsh chemicals and concentrated acids and bases (such as lye and ammonia).  Modern professionals have access to a wide range of materials and solvents, and conservators are armed with a substantial background in chemistry.

cleaning blog2     Concepts such as pH, conductivity, and solubility are always taken into consideration during testing.  Problematic pigments and other components can also be sensitive to different cleaning procedures.  So PLEASE think twice before grabbing your bottle of Windex® when you are thinking about cleaning a painting!!

The cleaning process has really involved two major steps, removal of the yellow varnish followed by the removal/reduction of discolored overpaint.  Blues, whites, and lighter tones tend to suffer the most dramatically when covered with a thick, yellow veil of varnish as demonstrated in Figure 1.  Below the varnish, the conservators also encountered multiple layers of restoration “glazes” that had been hastily applied across the entire surface.  Several other figures had been treated in a similar manner during previous restoration campaigns, notably the standing solider on the left side ofthe painting.  In Figure 2, it is possible to get a sense of how broadly the overpaint had been applied; in many areas the original drapery pattern and the folds of the cloak were entirely hidden or poorly misinterpreted by past restorers.

While some areas possessed large amounts of varnish and overpaint, others simply suffered from blanched varnish.  “Blanching” occurs when the varnish has become significantly degraded and no longer exists as a continuous film.  Microscopic air pockets begin to form within the film and between the varnish and the paint.  This makes it difficult to read the paint beneath as the varnish is no longer effectively saturating the surface.  Conservators decided to leave small areas of the blanched varnish intact for students, scholars, and visitors to get a sense of how degraded the varnish had become (see Figure 3).   By December, the conservation team had been able to successfully clean the bottom half of the painting, moving onto the top half after the New Year.CleaningBlog3

Mapping It

  • Posted by: Emily Wroczynski
  • Posted Date: October 25, 2013
  • Filed Under: Conservation

This week we have been examining the painting from a digital perspective. The conservation team was fortunate enough to borrow a copy of Metigo MAP software produced by the German company,  fokus GmbH Leipzig (through a collaboration with University of Delaware).

Metigo MAP Screenshot

Screenshot of Metigo MAP Software

Metigo MAP is a program used in the fields of architectural planning and art conservation that helps document and diagram conservation issues and the condition of a work of art or artifact.  Documentation is a task performed by all professional conservators before, during, and after treatment. Keeping meticulous records is not only an ethical obligation of our profession (AIC Code of Ethics), but it also serves as a reference during treatment. Over the next two years multiple interns will assist on this project, and the records that we are creating now will help inform new team members. The documentation also is a preservation tool and helps relate the complete history of this painting. Although we are removing overpaint from previous restoration campaigns, it is important to record what is being removed so that the public can understand exactly what this canvas has gone through.

We learned more about the applications of Metigo MAP from conservator Emily MacDonald-Korth’s talk, “Speed, precision, and a lighter load: Metigo MAP 3.0, a great advancement in condition mapping for large-scale projects, at the American Institute for Conservation’s 39th Annual Meeting.  Metigo MAP is especially useful for large-scale projects such as this one.

Sometimes conservators will draw a diagram by hand, but with something this large, suffering from multiple condition issues, a digital diagram is clearer and more efficient. Metigo MAP also rectifies the image that we import into the software so that all markings and outlines on the diagram are to scale and can be measured in the program. Therefore, we will be able to calculate the total area of the overpaint present once we have outlined it all on Metigo MAP.

Another key feature of the program is the ability to divide condition issues into separate mapped groups, like layers in Adobe Photoshop. This allows us to view all mapped issues at once or view a map of only one condition issue at a time. As we continue to clean the painting, we are revealing more areas of damage and loss that were previously concealed with overpaint. We plan to import a mid-treatment photograph of the painting into Metigo MAP and diagram any newly uncovered damage post-cleaning.

We are also using this project to help build a template in the Metigo program for symbols of common conservation issues and damage that can occur to a painted surface. Then, for future projects we can import the template and Metigo diagrams will be easy to compare because they will utilize the same legend.

In progress diagram of condition issues

In-progress Diagram of Condition Issues

Take a look at what we have recorded so far on our in-progress diagram, which clearly demonstrates the vast areas of overpaint that now obscure the artist’s original paint layers.  This diagram helps clarify and summarize what we are seeing everyday up close during treatment. The shaded purple zones indicate localized areas of overpaint that were most recently applied to the painting (presumably within the last 100 years). The blue hatching is used to map areas that were vastly overpainted during an earlier restoration attempt. The yellow lines are areas of paint loss while the red outlines demarcate areas of tenting paint. Tenting occurs when the canvas and/or earlier layers of paint expand and shrink deferentially due to gradual changes in relative humidity. These changes cause tension to build in the paint film, and eventually the paint gives way and cleaves into a peak that visually resembles a tent-like formation. Finally the white lines show where a previous application of varnish was not applied evenly and created drips.


Conserving a Giant: Resurrecting Pietro da Cortona’s “Triumph of David”

da-Cortona-1

Welcome to our weekly blog detailing the conservation treatment of Pietro da Cortona’s “Triumph of David”, a large-scale oil on canvas that currently resides in “Old Falvey,” Falvey Memorial Library’s original wing. The painting first came to the University in 1956, donated by the late Princess Eugenia Ruspoli who inherited the artwork from her late Italian husband, Prince Enrico Ruspoli. For much of its life, the “Triumph of David” hung within the walls of Castle Nemi. The castle sustained significant damages during World War II which may partly explain the current condition of the painting. Pietro Berrettini da Cotrona was perhaps best known for his work as an architect, however the artist and his workshop executed several exquisite fresco cycles in addition to a number of canvas paintings. As only a hand-full of Pietro’s canvas paintings can be found in museum collections, the University is make a concerted effort to restore the artwork and promote collaborative research amongst art historians, conservators, and scientists. More information can be found in the recent press release.

Villanova now joins a hand-full of cultural institutions and conservation laboratories that have begun to embrace the concept of “visible conservation.” A permanent space in Old Falvey’s reading room has been allocated for the project, allowing students as well as the general public to observe the treatment process and even interact with the conservation team. A schedule will soon be posted, listing dates/times for formal tours and a live web-cam will add an interactive element to the project. This will help to raise awareness of contemporary conservation methods, the history of the painting, and the upcoming renovation of the Library’s reading room.

Collaboration on Campus

An exciting aspect of the project will involve the collaborative efforts of scholars, faculty, staff members, and students, interactions that will occur on a daily basis in the publically accessible conservation space. Dr. Anthony Lagalante, Dr. Amanda Norbutus, and graduate student Kristen Watts from the Chemistry Department will be working alongside the conservation team, performing pigment analysis in an effort to learn more about the materials used by Pietro and his workshop. Dr. Mark Sullivan, Dr. Timothy McCall, and senior undergraduate student Rachel Godat from Art History will be offering their expertise as well, helping the conservation team to gather more information relating to the artist, his workshop, and other aspects of the painting’s provenance. Finally, Darren Poley and the library staff will be integral in the promotion of the project and it’s connection to the upcoming renovation of the Library’s Old Wing. Future events will be announced as the treatment progress and will likely include lectures, symposia, web projects, and/or interactive workshops.

The Conservation Treatment

Detail Showing OverpaintThe treatment of the painting will be carried by painting conservator Kristin deGhetaldi over a period of two years with the help of conservation interns and graduate students (currently Maggie Bearden and Emily Wroczynski). The painting is presently covered with several layers of discolored and degraded over-paint and varnish, unoriginal materials that have aged poorly and now obscure the original colors of Pietro’s vibrant palette. Conservators are professionals who have specialized knowledge and skills in the arts, sciences, and other fields; responsibilities can include establishing appropriate environmental controls, stabilizing the structure of an object, compensating for surface disfigurement from deterioration and/or damage, and undertaking technical studies. A professional conservator conducts these activities according to the Code of Ethics of the American Institute for Conservation of Historic and Artistic Works.

In years past, those interested in becoming a conservator would typically enlist as an apprentice in a restoration studio. Today, however, most students pursue a master’s degree in art conservation after obtaining a bachelors degree in art history, studio art, the sciences, or other related fields. In order to be accepted into a graduate degree program in the United States, students must satisfy extensive course requirements (e.g. organic chemistry, art history/anthropology courses, a studio art portfolio, etc.) and complete a certain number of hours serving as a volunteer/intern in a cultural institution or private studio. This pre-program experience often takes additional time beyond completion of an undergraduate degree. Students who are interested in learning more about graduate programs should also visit the Emerging Conservation Professionals Network blog.


Last Modified: October 11, 2013