

“Wax on, Wax Off:” Silicone Casting Techniques for Textured Fills

Figures 1. Textured wax/resin fill
as seen in raking light.
Currently, the conservation of the Triumph of David has progressed to the in-painting stage of the conservation treatment. However, before the conservation team could begin in-painting, the areas where there was significant loss of paint and/or ground layers had to be addressed. All losses needed to be filled to match the surrounding surface area.
Most paintings have a textured surface. This can include the artist’s brush strokes, impasto, and various craquelure patterns. The surface of the fills can therefore be leveled and textured to blend with the surrounding substrate. No matter how skillfully an area is in-painted, if a fill is not prepared carefully it will stand out from the original surface and cause unwanted distraction.
The Triumph of David has extensive paint and ground loss both the left and right sides. A barrier layer of 15% B72 in Shellsol A100 was applied by spray application over the entire surface of the painting. This high molecular resin helped to saturate and even-out the painted surface, without penetrating the substrate. It also built up different levels of molecular weight, which ensures that all additional treatment application would be reversible.
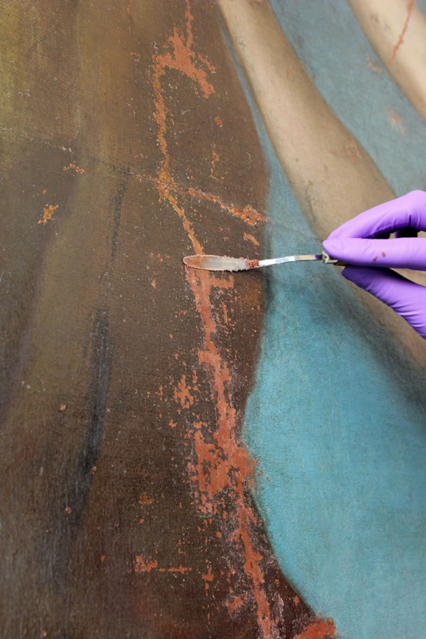
Figure 3. Pigmented wax fill
is applied over Modostuc fills.

Figure 2. Pigmented wax (thinned in mineral
spirits) applied to the painting’s surface with
a palette knife. A fume extractor, gloves, or
other personal protective equipment are
used by team members during this process.
The filling process consisted of several steps. First, Modostuc was used to partially fill the areas of ground and paint loss. Modostuc is a PVA formulation based putty that is very dense compared to other fillers and has little to no shrinkage. It was also toned red with gouache to match the original ground layer. Next, wax fills (4 parts bleached beeswax, 2 parts Ketone N (Larapol K 80),1 part carnauba wax) were applied on top of the Modostuc fills, ensuring that fills were slightly above the painted surface. In order to create the textured appearance on the wax fills, silicone molds made with various textures were used to press the patterns into the wax.
If you closely examine the surface around an area of loss, you will notice that the texture varies considerably from one point to another. The conservation team had to be very precise about which area was chosen to cast the silicone molds, paying close attention to the borders of the losses. Textures that had to be accounted for included canvas weave, brushstrokes, how much impasto there was, do the strokes follow a specific direction, and the crack patterns. In the case of the Triumph of David, the crack patterns varied throughout the entire painted surface.

Figure 4. Placing a sheet of Mylar on
the target location and apply the
resin to the painting’s surface
with a palette knife.
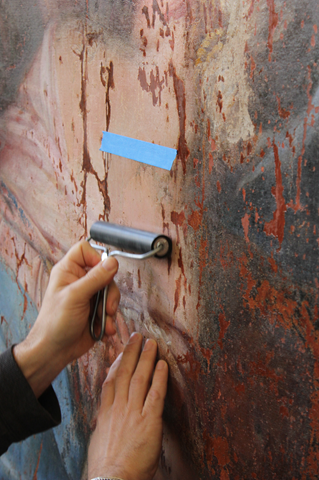
Figure 5. Use a rubber roller to roll the
resin in a downward direction.Then,
roll the resin in other directions, but
do not taper the thickness at the outer
edges.
Once an area was selected for casting, the silicone resin was prepared. The conservation team used Wacker’s Elastosil® M 4600 A/B, using the Mixing ratio: 10:1 pbw (for example, 10 grams resin to 1 gram catalyst). This resin was found to be a good replacement of the RTV M 539, which is no longer made. The resin was thoroughly mixed with the hardener and placed onto a clean transport sheet of Mylar. Using a small palette knife, the resin was evenly applied onto the painting’s surface, ensuring that the resin did not taper at the outer edges. This would cause uneven heat transfer and also make it more difficult to peel the cured resin. A clean sheet of Mylar (without wrinkles), a few inches larger in each dimension than the spread silicone, was secured over the silicone. With the Mylar held taut, a rubber roller was used to press the silicone into the surface pattern until obtaining a thin, uniform film. The silicone cast could then be carefully peeled off the painting with the Mylar.

Figure 6. Seven locations in The Triumph of David
were initially selected for casting molds. These sites
provide a range of surface textures including
craquelure and brush strokes.
The appropriate cast was then be placed over the wax/resin filling by securing one side of the Mylar to the paint film with low-tack drafting tape, to keep it from shifting. Heat was then applied with a tacking iron to warm the surface until the texture of the cast is printed onto the surface of the fill. If there was too little wax/resin for an accurate transition, tiny bits of wax/resin was carefully added exactly where needed. After all wax fills were textured, the team was able to move onto the in-painting phase of the treatment.
– Claire Burns and Keara Teeter
0 Comments
No comments yet.
RSS feed for comments on this post.
Sorry, the comment form is closed at this time.